Anyone can easily create a farm with their Quipuswap pair and reward token. Our farms work with both FA1.2 and FA2 Quipuswap pairs, as well as both FA1.2 and FA2 reward tokens.
This page is under heavy construction

¶ What Does Farming Provide Projects/Devs?
Farming can be an effective way for projects and token creators to bring attention or incentives to holders and liquidity providers. The goal of providing incentives to token holders is to attract and retain users by offering higher reward payouts for higher token staking allocations. The goal of rewarding liquidity providers is to not only incentivize token holders, but also reward those who provide liquidity for that token pair on a DEX. This promotes more stable trading for that pair. The best way to understand this is by showing some examples. Let’s take a look at simply rewarding token holders first (SSF), then we will look at rewarding liquidity providers (LPF).
¶ Single-Sided Farming
To begin, lets say a project has just launched its token that it will use on its platform called Contract Calls Ltd and its token will be $CCL. The project hosted a private and public token offering to certain buyers. It now wants a way to reward those early buyers with farming, while also drawing in new users. At the same time they want to distribute another 30% of its total token supply over a six-month period. The project would create a farm that pays out $CCL tokens to those who stake the $CCL they already have or buy. At this point, users could want to buy more to raise their reward percentage and bring in more rewards for that particular token to users.
¶ Liquidity-Provider Farming
Let’s say project Low Gas Fees Ltd with token $LGAS wants to raise the amount of XTZ/LGAS token pair liquidity there is on their selected Decentralized Exchange (DEX). Right now there is only 100 $XTZ and 1,000 $LGAS in the liquidity pool. Low Gas Fees Ltd has a large user base and their users want to buy 1,000 $XTZ worth of $LGAS at a time. However, since there are only 1,000 $LGAS tokens in the pool, the purchase would make the price of the token skyrocket and Low Gas Fees Ltd users would be paying an absolute premium for those tokens and would not be able to complete the purchase. More liquidity means less volatility when it comes to trading.
By having a farm that rewards users for using a LP pair, that project can decrease the trading volatility of that pair by incentivizing users who provide LP. These rewards also usually feature a higher payout percentage than a typical SSF farm, as users are investing more “money” and taking a larger risk than SSF farmers.
¶ Using Crunchy’s Farming Service
We want projects and developers to feel comfortable and confident when it comes to building farms on Crunchy, that’s why we have made the process simple! To achieve this we have created a quick guide to creating the farm, understanding the fee structure and making the interface self-explanatory. We will outline below the steps in which you will create your first Crunchy farm!
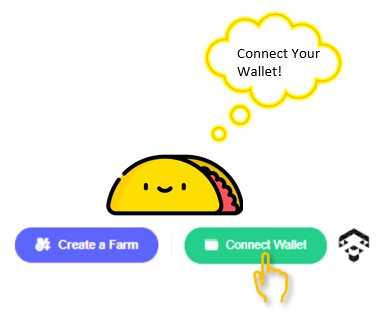
¶ Connect Your Wallet
As with most applications on Tezos, your first step is going to be to connect your wallet. After going to the “Farm” section of our Crunchy site (https://app.crunchy.network/#/farms) you will go to the top-right corner of the screen and click on the Connect Wallet icon.
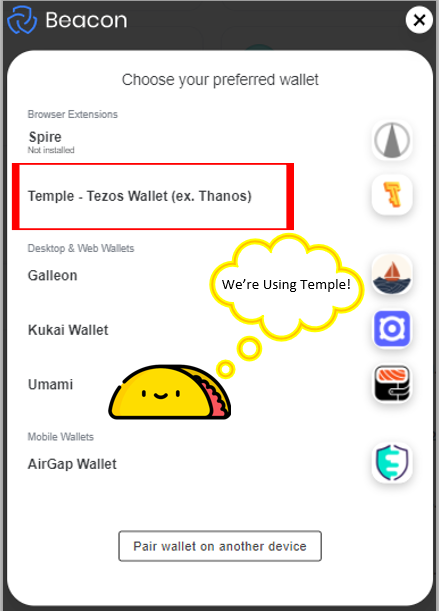
¶ Selecting Your Wallet
Once you have clicked on the Connect Wallet icon, a wallet selection menu will populate. Crunchy supports most current existing Tezos-based wallets, so feel free to use your wallet of preference. For the tutorial we will be using the Temple wallet. Simply select the wallet you wish to use to set up your farm.
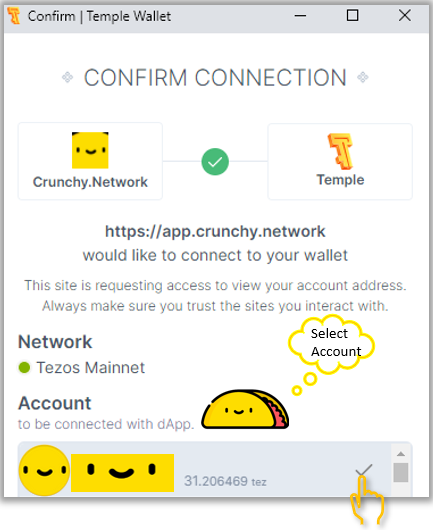
¶ Selecting Your Account
Now that you have selected which wallet you want to use, you will be prompted to select which account in your wallet you wish to connect. Again, make sure this account holds the tokens that you will be using to set up your farm, as well as pay the farming fees (outlined later in this guide). Once you select which wallet you want to use you will be moved to the next step!
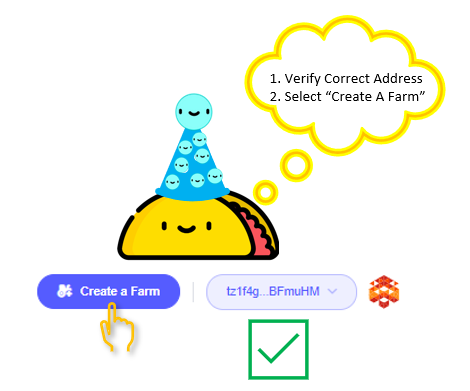
¶ Verifying You Are Connected
Now that you have selected your wallet and account, you will be taken back to the main Crunchy farming page. Look in the top-right corner of your screen and make sure that the wallet info displayed is correct. Once you have verified this you are now ready to start creating your farm! Click on the Create a Farm icon.
¶ Creating Your Farm
Now, we know this looks like a lot, but it is really all quite simple. There are just a few pieces of information to plug in and you will have your farm created in no time! You will see two sets of data per color; data on the left is input data and data on the right is output data based on the information you put in the fields on the left. We have color-coded the data to you can know what changes will be made based on which data is input.
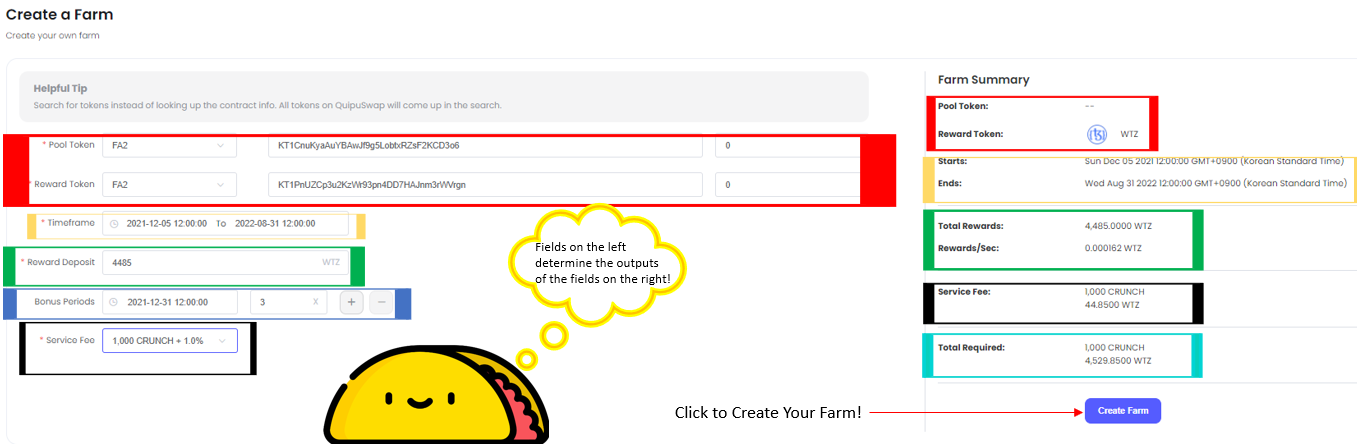
¶ *RED (Token Info)
This is where you will put in the information for your tokens. The top bar is input for the pool token you want users to stake. The line beneath it is the reward token that users will receive upon staking their tokens. The only info you need is the Token Standard, Contract Address and Token ID. (Hint: You can simply insert the name of the token in the Contract field if the token is listed on Quipuswap).
❗Data on the right will adjust to show what your pool and reward tokens are if their data is recognized.
¶ *YELLOW (Farm Lifespan)
This field is where you will input the time you want your farm to begin and end. The time and date displayed will be relevant to your time zone, so keep in mind if you are wanting to work off of a Zulu or UTC time zone you need to calculate what time zone that will be based off of your current time zone. You can have farms start and end at any point in time, but once they are build that farming contract will hold those tokens until the contract expires (the end date of your farm).
❗Data on the right will display your current selected farm start date and end date and your current time zone.
¶ *GREEN (Depositing Rewards Tokens)
This field is where you will select the amount of designated rewards tokens you want to have added to the rewards payout pool. Make sure that you have enough of the rewards tokens in your wallet account to cover the amount of rewards you wish to add to the farm.
❗The Total Rewards and Rewards/Sec field on the right will depend on the total amount of reward tokens allocated and the lifespan of the farm.
¶ *BLUE (Bonus Periods)
This fields allow you to set a bonus period for you farm. Farms start with a standard 1x multiplier, but you can set bonus periods with additional multipliers to incentive different periods of your farm. This is an optional field.
❗Clicking the “+” icon allows you to add an additional bonus period.
❗Clicking the “-” icon removes that particular bonus period.
¶ *BLACK (Service Fee)
Crunchy charges a service fee that includes our native CRUNCH token and the rewards token of your farm. There are three service fee options:
🔴 100 $CRUNCH tokens & 1.5% of the rewards tokens deposited
🟡 1,000 $CRUNCH tokens & 1.0% of the rewards tokens deposited
🟢 10,000 $CRUNCH tokens & 0.5% of the rewards tokens deposited
❗The Service Fee field on the right will show the amount of CRUNCH tokens and the amount of rewards tokens that will be added to the Treasury for this particular farm (what this means to you is this will be the total fee charged). Created farms’ fees go into the Crunchy Treasury and pays out rewards to our $crDAO holders.
¶ *CYAN (Total Required Tokens)
This field is the total amount of tokens that will be charged for the farm. This is a combination of your Rewards Deposit and Service Fee.
❗Ensure that you have enough of your rewards token and $CRUNCH in your wallet to cover the Rewards Deposit AND Service Fee
¶ Create the Farm
Now you have filled in all required fields to create your farm! Select the Create Farm icon and your farm will now be completed. You are almost finished with the entire process!
¶ Confirm Your Farm Creation
Now that you have requested to have your farm created, you will have one final step and that is to confirm your transaction. Simply click on Confirm icon when the Confirm Operations tab appears.
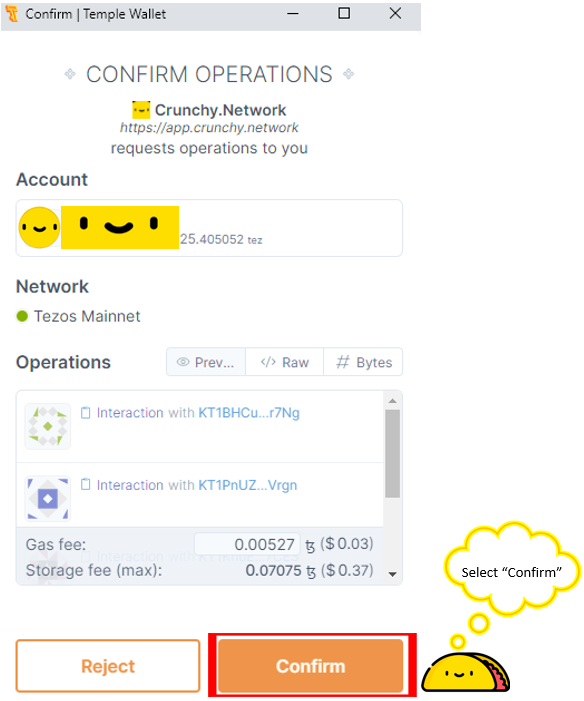
🌮 Congratulations! You have now successfully completed your farm. You can go to the Crunchy Webpage and look for the Farms tab on the left side. Select the Farms icon and you can search for your new farm! 🌮